Friday, 2 June 2017

Lucky Lamb

I have made another lamb aptly named Lucky. "Lucky" that I was able to find and combine an assortment of chunky yarns from my stash to make him look adorable. Lucky Lamb loved posing for these photos.

Luckily I was able to make his face, ears, arms and legs from the same yarn, but if you look closely, you can see three different yarns were used for his head and body. It's a mish-mash that works.
My first Little Lamb was made using the yarn on the left in the photo above. Lucky Lamb was made using chunky wool like the yarn on the right. I followed the same pattern for both lambs but added a few more rows to the arms and legs to make Lucky look more balanced.
Lucky Lamb and Little Lamb enjoyed spending time in our garden before heading inside to hang with the gang in the big white basket. Lucky really is quite a big little lamb. He towers over the Little Lamb for Liam.
If you would like to make a Little Lamb too, you can find the free pattern here. This pattern is so cute, I might have to crochet a whole flock. 

In the meantime, I continue to crochet using yarn from my stash. I am currently working on another Daisy Doll. My last one went to live with a baby girl named Isabel Anne. I think I'll add pink petals this time. As always, I will be sure to share photos once I finish. 


Be the first to comment - click on No comments: below

Thursday, 1 June 2017

Buster Bear

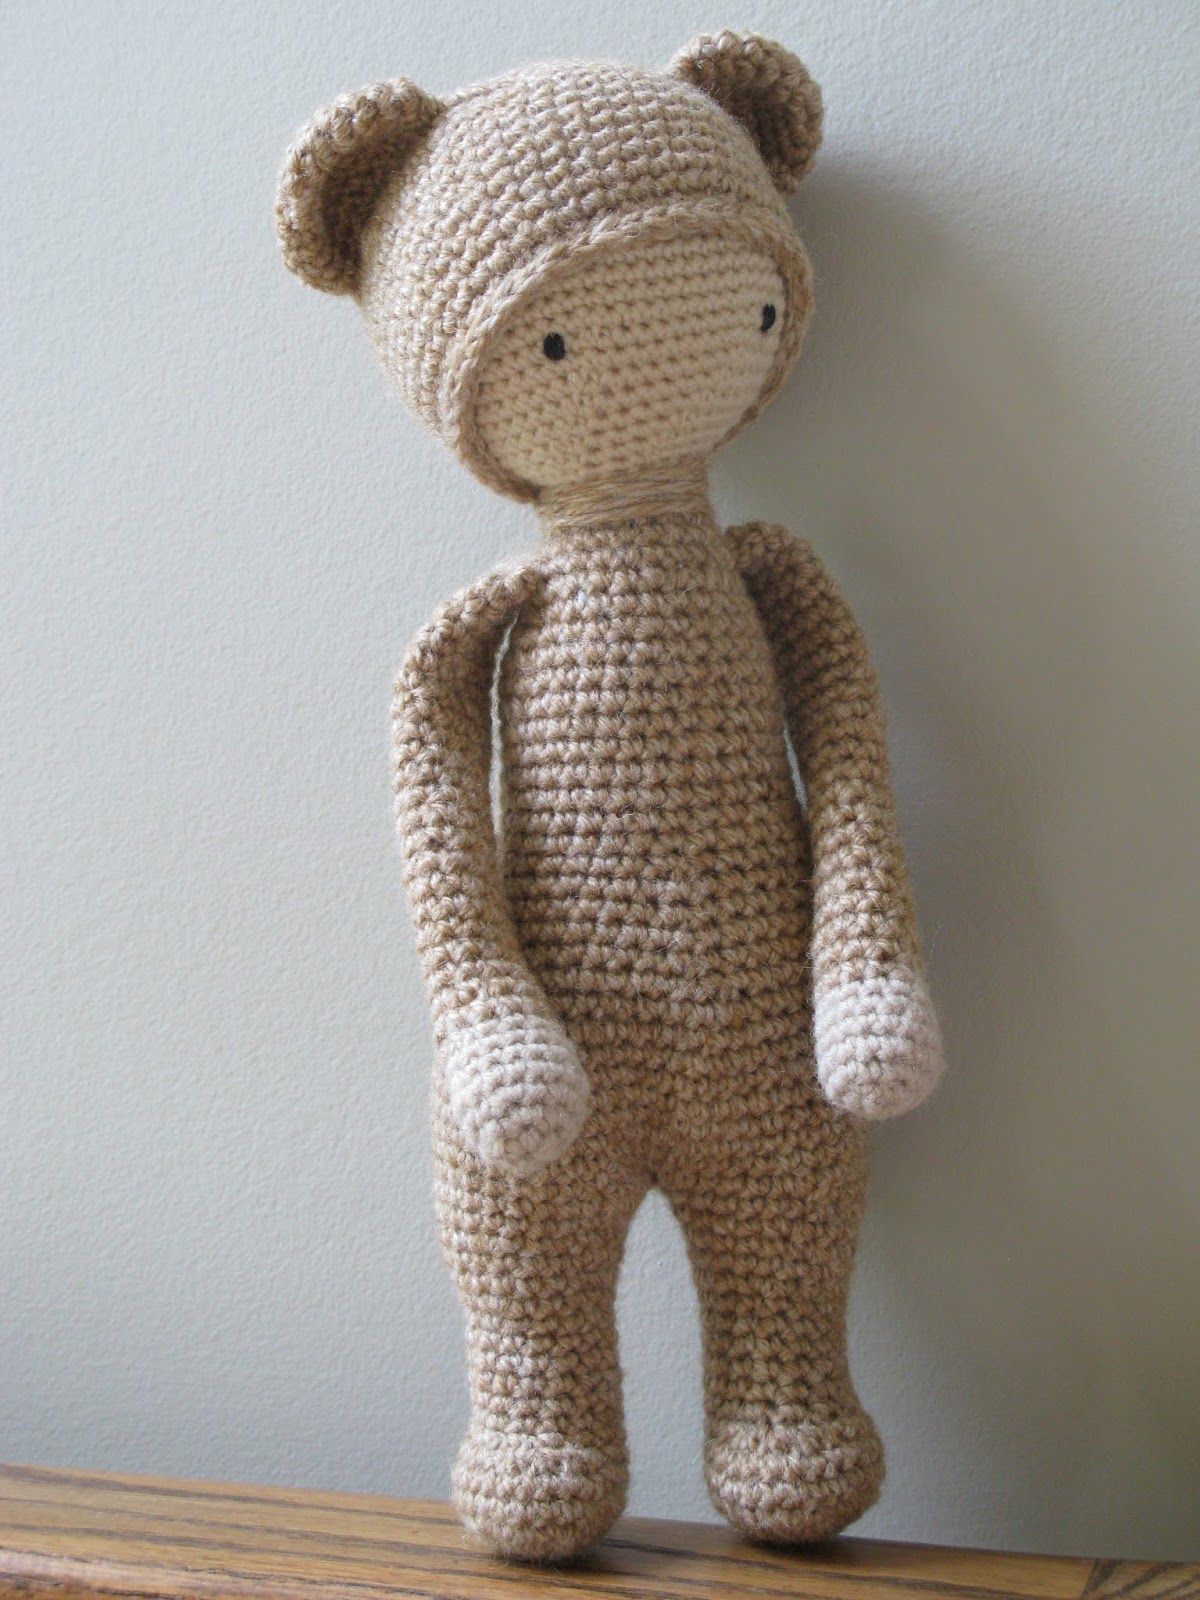
Buster (short for Stash-Buster) Bear was made using a leftover ball of light brown chunky yarn. I have no idea what kind of yarn because it came from a friend who gave me his deceased mother's stash earlier this year. 

I also have no idea how much yarn exactly. I started with one big ball of hand-wound yarn finishing with only a short strand leftover ... so lucky.
Buster Bear was happy to pose for photos. Isn't he a sweet little bear?
Boo Bear is soft and cuddly while Buster Bear is sturdier on his feet. Boo Bear and Buster Bear get along famously despite their differences. 

Buster Bear was made following my pattern for Boo Bear with extensive alterations to allow for chunky weight yarn making up the hood, arms, legs and body combined with worsted weight yarn for the head. You can read about the controversy over Boo Bear's pattern here if you missed it.

Buster Bear is different enough from Boo Bear that I think it totally fair to share his pattern. If you look closely, you can clearly see the difference in stitch sizes. My yarn was really quite thick, unfortunately, I do not know exactly how thick. If you choose a different weight yarn, you can use this pattern as more of a guideline making alterations as required.

Buster BEAR PATTERN


Materials used:
1 ball of worsted weight yarn in cream colour (from stash)
1 ball of chunky weight yarn in brown colour (from stash)
Hook size = 3.25 mm + 4.0 mm
yarn needles to join pieces
Polyester Fiberfill for stuffing
Small amount of black yarn (for eyes)

Stitches used:
ch - chain stitch
ss - slip stitch
sc - single crochet
inc - sc increase
dec - sc decrease (sc2tog - single crochet 2 together)
Magic Circle - see how here (start each piece with magic circle)

Time to Complete - 14 hours (approximately)
Finished size - 14 inches tall

Legs (x2)
Use brown chunky yarn and 4.0 mm hook. Working from the bottom up, starting with a magic circle, use stitch marker to mark end of rows (work in continuous rounds with no joining)
R1 - 6 sc (6)
R2 - inc x6 (12)
R3 - (sc inc) x6 (18)
R4 - (2 sc inc) x6 (24)
R5-R6 - sc around (24)
R7 - sc2tog x4 + 16 sc (20)
R8 - sc2tog x4 + 12 sc (16)
R9-R16 - sc around (16)
R17 - (3 sc inc) x4 (20)
R18-R20 - sc around (20)
R21 - (4 sc inc) x4 (24)
R22 - sc around (24) Finish off and stuff leg.

Body
Join legs on middle 2 stitches as shown in this tutorial. The instructions are in German but the video alone is enough to understand the technique. Once the legs are joined continue crocheting around both legs to form the body.

R23 - sc around (50)
R24 - sc around (50)
R25 - (5 sc inc) x 7 + 7 sc (55)
R26 - sc around (55)
R27 - sc around (55)
R28 - sc around (55)
R29 - sc around (55)
R30 - (9 sc dec) x5 (50)
R31 - sc around (50)
R32 - (8 sc dec) x5 (45)
R33 - sc around (45)
R34 - (dec 7 sc) x5 (40)
R35 - sc around (40)
R36 - (dec 6 sc) x5 (35)
R37 - sc around (35) 
R38 - (dec 5 sc) x5 (30)
R39 - sc around (30)
R40 - sc around (30)
R41 - sc around (30)
R42 - sc around (30)
R43 - sc around (30)
R44 - sc around (30)
R45 - sc around (30)
R46 - sc around (30)
R47 - sc around (30)
R48 - dec 2x on each hip (26)
R49 - sc around (26)
R50 - dec 1x on each hip (24)
R51 - sc around (24)
R52 - dec 2x on each side (20)
R53 - sc around (20)
R54 - dec 2x on each side (16)
R55 - sc around (16)
Finish off and cut yarn leaving a long tail to attach the head. Stuff body firmly.

Arms (x2)
Start with cream worsted weight yarn and 3.25 mm hook
R1 - 6 sc (6)
R2 - inc x6 (12)
R3 - (sc inc) x6 (18)
R4 - sc around (18)
R5 - (4 sc dec) x3 (15)
R6 - sc around (15)
R7 - (3 sc dec) x 3 (12)
Change to dark brown yarn at end of R7
R8 - sc around (12)
R9 - (4 sc dec) x 2 (10)
R10-R34 - sc around (10)
Finish off and cut yarn leaving a long tail for joining. Stuff only hands and part way up arm.

Head
Use cream worsted weight yarn and 3.25 mm hook.
R1 - 6 sc (6)
R2 - inc x6 (12)
R3 - (sc inc) x6 (18)
R4 - (2 sc inc) x6 (24)
R5 - (3 sc inc) x6 (30)
R6 - (4 sc inc) x6 (36)
R7 - (5 sc inc) x6 (42)
R8 - (6 sc inc) x6 (48)
R9 - (7 sc inc) x6 (54)
R10 - (8 sc inc) x6 (60)
R11 - sc around (60)
R12 - sc around (60)
R13 - sc around (60)
R14 - sc around (60)
R15 - sc around (60)
R16 - sc around (60)
R17 - sc around (60)
R18 - sc around (60)
R19 - sc around (60)
R20 - sc around (60)
R21 - (8 sc dec) x6 (54)
R22 - sc around (54)
R23 - (7 sc dec) x6 (48)
R24 - (6 sc dec) x6 (42)
R25 - (5 sc dec) x6 (36)
R26 - (4 sc dec) x6 (30)
R27 - (3 sc dec) x6 (24)
R28 - (2 sc dec) x6 (18)
R29 - (2 sc dec) x3 + 6 sc (15)
R30 - sc around (15)
R31 - sc around (15)
Finish off and cut yarn leaving a long tail for joining. Stuff head and neck firmly to hold shape.

Hood
Use brown chunky yarn and 4.0 mm hook. Check to make sure hood fits. You may have to adjust increases or decreases depending on your yarn thickness.
R1 - 6 sc (6)
R2 - inc x6 (12)
R3 - (sc inc) x6 (18)
R4 - (2 sc inc) x6 (24)
R5 - (3 sc inc) x6 (30)
R6 - (4 sc inc) x6 (36)
R7 - (5 sc inc) x6 (42)
R8 - (6 sc inc) x6 (48)
R9 - (7 sc inc) x6 (54)
R10 - sc around (54)
R11 - sc around (54)
R12 - (7 sc dec) x6 (48)
R13 - sc around (48)
R14 - sc around (48)
R15 - sc around (48)
R16 - sc around (48)
R17 - sc around (48)
R18 - sc around (48)
R19 - sc around (48)
R20 - (6 sc dec) x6 (42)
R21 - ss loosely around (42)
Finish off and cut yarn leaving a long tail for joining. Position on head as shown in photos above. After attaching head to body, I like to wrap the tail from the hood around the neck to cover joining stitches.

Ears (x2)
Use brown chunky yarn and 4.0 mm hook.
R1 - 6 sc (6)
R2 - inc x6 (12)
R3 - (sc inc) x6 (18)
R4 - (2 sc inc) x6 (24)
R5-7 - sc around (24)
Finish off leaving 8" tail for joining.
Fold ear in half to form a natural curve and attach to head (see photo above).

Tail 
Use brown chunky yarn and 4.0 mm hook.
R1 - 6 sc (6)
R2 - inc x6 (12)
R3-4 - sc around (12)
Finish off leaving 6" tail for joining.
I just stuffed starting yarn end into tail so it is only lightly stuffed then attached to form a neat little ball on his backside (see photo above).

Refer to photos of Buster Bear before joining ears, head, arms and tail. I like to pin the pieces in place to pick the most pleasing look before attaching. 


Be the first to comment - click on No comments: below.

Wednesday, 24 May 2017

Daisy Doll

Introducing Daisy Doll - crocheted using my Sunflower Doll Pattern and leftover, worsted weight, acrylic yarn in green, off-white, white and yellow with a tiny bit of black and pink for her eyes and mouth. 

Choosing appropriate names for my creations is a huge part of the fun for me. I named this doll Daisy because of her white "daisy" petals. 

Daisy Doll posed for photos on Friday after work while the sun shone. Isn't she adorable with pretty white petals framing her sweet smiling face? She twirled around to show ALL of her sides - front, back and side views too.
Little Lamb joined Daisy for a few fun photos. See how Daisy Doll towers over Little Lamb. Daisy Doll easily rests her hand on Little Lamb's head.  
Daisy Doll and Little Lamb snuggle comfortably in the basket with Pink Piglet, Lucy Lamb, Stash-Buster Bear (brown) and Boo Bear (grey). 

Stash-Buster Bear is another recent addition made from, you-guessed-it, leftover yarn. I plan to tell more about him in a separate post. 

In the meantime, I continue to crochet at no cost to me using yarn from my stash. Watch for more cuties made by meo my crochet coming soon.

Be the first to comment - click on No comments: below.

Tuesday, 9 May 2017

Moving Day

Last Sunday (April 30th), we drove to Guelph to help with our son's fourth annual Moving Day. Keys for their new place were to be available for pick up after 12 p.m. We arrived just after 11:30 a.m.  

The moving crew this year included three young men (our son and his roommates) and two sets of parents including us. For vehicles they had a pickup truck (borrowed), a van, our Santa Fe and our son's hatchback. 
We were pleasantly surprised to see packing was well underway when we arrived. Box springs were already loaded and ready to go. 
We filled the bins and boxes we had brought then helped load up the van and the hatchback before making our first trip over to their new place.
I rode with our son and his dog. Ajax sat in his bed, but seemed a little unsettled with all the chaos of Moving Day.
"Smile boys." OK never mind ... not a lot of enthusiasm for Mom taking photos on Moving Day.
I took one photo of the kitchen then set to work carrying things upstairs and downstairs as directed. Mostly I kept Ajax company while everybody else made multiple trips back and forth. Moves involving three strong young men are so much easier ... they do all the heavy lifting.

It took all afternoon to move everything. They were lucky with the weather. The rain held off until after the last boxes were unloaded. By then, everybody was hungry. We met at Fionn MacCool's for a yummy dinner before heading for home, leaving the boys to set up their bedrooms and finish unpacking.

Although I didn't take more pictures of their new place, I will tell you it is a three bedroom townhouse condo with a three piece bathroom upstairs, a two piece downstairs, a fenced patio out back and an unfinished basement with laundry and plenty of storage. The whole place has been freshly renovated - new carpet, linoleum, kitchen cabinets, appliances, bathroom fixtures, paint - everything is shiny and new. 

Their new place is slightly smaller than their last place, but the central location with better bus service more than makes up for that. Besides one less bathroom to clean is probably a good thing. They were missing curtain rods on the newly patched and painted walls, but my son tells me they have already installed rods on all but the kitchen window.

My son shared a couple photos taken at their new place. They look happy.
With Moving Day done, we wish them all another great year in Guelph.  

You can read about last year's move here if you missed it.

Be the first to comment - click on No comments: below

Monday, 8 May 2017

Little Lamb for Liam

After making two blankets for our grandson due in August, I decided he should have his very own hand-made toy too. I finished this Little Lamb for Liam on Sunday. Isn't it absolutely adorable?

I love this Little Lamb with it's bumpy, bobbly textured head and body ... perfect for little hands to grab, cuddle, squish and toss about.

This Little Lamb posed for photos on Sunday while the sun shone. It has been raining non-stop for a week, so sunshine was much appreciated.
If you would like to make a cute Little Lamb just like this one, you can find the free pattern here designed by blogger Ashleigh at Sewrella

I used yarn from my ever-growing stash for this project. A couple friends gifted yarn to me recently, enough to cover a table in our dining room. There are various odds and ends not identified with ball bands. I am not really sure what any of it is, but have sorted it by colour and plan to make more toys since gauge is not important.

I wonder how many toys I can make from this pile? I should gather all my yarn to see how much I have altogether. I expect there is enough to keep me crocheting for a long, long time - years even. I must say that thought appeals to my sensible, frugal side.

Be the first to comment - click on No comments: below

Tuesday, 2 May 2017

Rainbow Cloud Ripple Stripe Blanket

 
On Saturday I finished another blanket for our grandson due to arrive in August. This "Rainbow Cloud Ripple Stripe Blanket" was made using yarn left over from my Granny Stripe Rainbow Cloud Blanket. You can read all about that blanket and the "rainbow cloud" naming reference here
I spent the morning sitting on the floor in front of my laptop sipping on cappuccinos and darning in yarn ends for all those stripes before starting on the border. I mention "sitting on the floor" because I crocheted both of these blankets almost entirely from the floor. 

You may have heard me talk about floor-sitting before. Over a year ago, I discovered Katy Bowman and her theories regarding more natural movement. I wrote about healthy floor-sitting hereI thought crocheting while floor-sitting would be impossible for me. I was wrong. It took almost a year of practicing floor-sitting at home, but finally I can sit comfortably and crochet too. Persistence pays off.

I was happy to see the weather had cleared by the time I finished the border. I stretched out the blanket and took a few photos while the sun was still shining then went for a nice long walk to stretch out my legs.
I love the ripples of rainbow cloud colours randomly arranged to create this Rainbow Cloud Ripple Stripe Blanket. 
I spread out both blankets for comparison. You can see this ripple stripe blanket is smaller and more colourful than the Granny Stripe Rainbow Cloud Blanket. I tried to mimic the rainbow clouds concentrating all the colours at one end with bands of each colour appearing among the white and grey ripples at the other. 
I can't pick a favourite ... love them both. I especially love how these Rainbow Cloud blankets coordinate so well together.
Both blankets are folded, packaged and ready to go when we visit in September. It seems a long way off ... four months to be exact. Yes I'm counting. Anticipating a new baby in our family is very exciting indeed.
To make this blanket, I followed instructions provided by blogger Lucy at Attic24 called "Ripple Blanket Know-how".

Technical details for this Rainbow Cloud Ripple Stripe Blanket are listed below for the crocheters out there who might like to make one too. 

Starting Chain - 143
Finished Size - 34"x43" (multi-use size blanket)
47 stripes
94 rows
Border - 3 rounds
Time to Complete - Approximately 18 hours (10 mins per row + border)
Hook size - 4 mm

Yarn Used (Light #3 weight):
  • Patons Beehive Baby Sport (100 g/3.5 oz)
    • Baby Grey (1 ball)
    • Vintage Lace 
    • Angel White (1 ball)
  • Bernat Softee Baby (140 g/5 oz)
    • Soft Fern 
    • Aqua 
    • Soft Red 
  • Red Heart Baby Hugs (127 g/4.5 oz)
    • Lilac 
I made this blanket using yarn left over from my last project - the Granny Stripe Rainbow Cloud Blanket - adding 1 more ball of Baby Grey and 1 ball of Angel White (brighter white than Vintage Lace) to the mix.   


Be the first to comment - click on No comments: below