Showing posts with label bunny. Show all posts

Monday, 31 December 2018

Crochet Brown Bunny

I made another critter from my stash. What do you think of this Crochet Brown Bunny? Isn't he sweet in his little blue scarf with a blue and white fringe? I especially love his fluffy white pompom tail.
 
 
If you would like to make a similar looking bunny, I loosely followed this free pattern by blogger Sharon at Amigurumi To Go just changing the ears, legs and arms to make my Crochet Brown Bunny unique. 

Wishing you all a Healthy and Hoppy New Year in 2019
from meo my crochet.

Be the first to comment - click on No comments: below

Monday, 9 March 2015

Evie Bunny Done

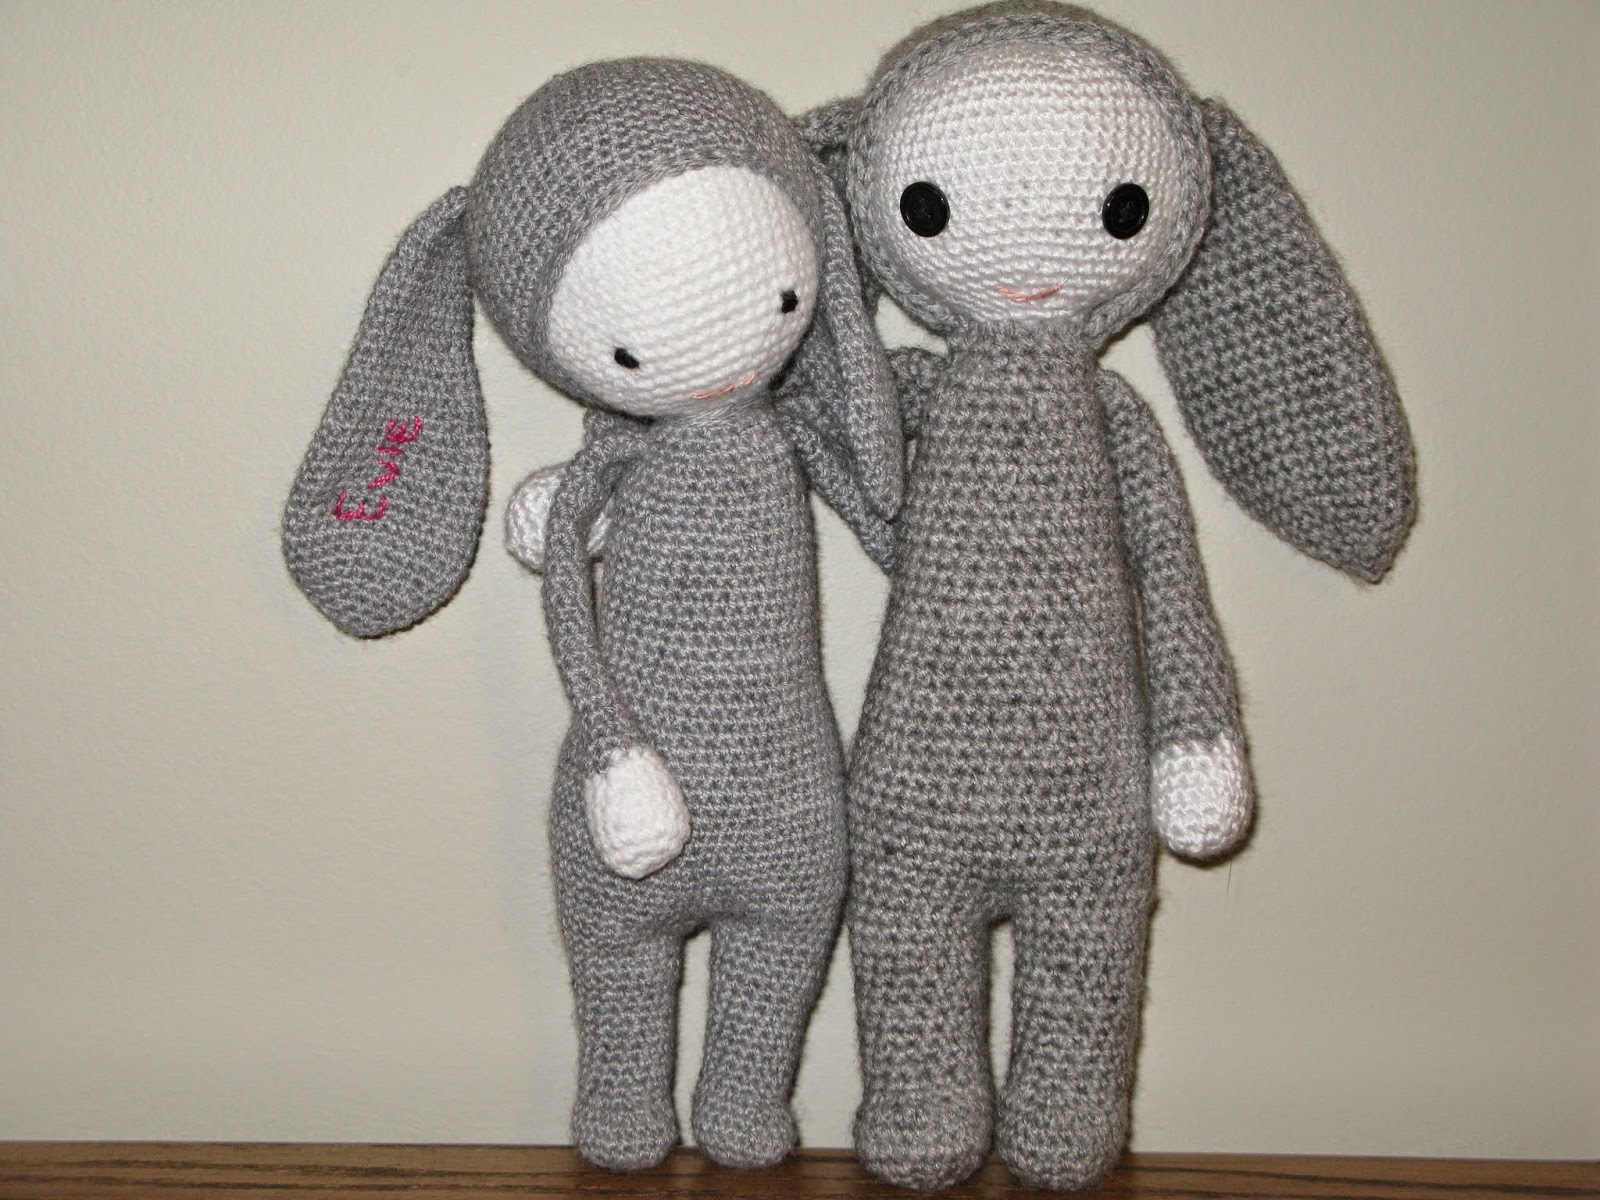
Tonight I finished Evie Bunny following my Blue Bunny pattern from this post. I wanted to test the pattern one more time. Happily, it is easy to follow and error free. I am so pleased to have finished with plenty of time to pack for our trip to Boulder. We leave on Saturday and I'm getting excited... just 5 more sleeps.

Allow me to introduce Evie Bunny. Doesn't she look adorable with her ear tattoo in pink ink?

Evie Bunny is a bit shy when she first meets Bobo Bunny.  
Bobo introduces himself and In a very short time they are best of friends. Evie and Bobo Bunny are smiling and excited about flying to Boulder together on Saturday. They can hardly wait to see their new home.
Bye Bye Bunnies. Enjoy your new life in Boulder.

For the crocheters out there, I've included a few technical details. Evie Bunny was crocheted using Bernat Softee Baby yarn in flannel (light grey) and Snuggly Wuggly Loops and Threads yarn in white. The eyes and mouth are embroidered in black and pale peach yarn. I embroidered the name using hot pink embroidery thread. Evie Bunny was made following this pattern and Bobo Bunny was made with this pattern. 

You won't be disappointed if you decide to make either of these bunnies.


Be the first to comment - click on No comments: below

Monday, 2 March 2015

Bunny Pattern Perfected

Last week I started another Bunny using Loops and Threads Snuggly Wuggly yarn in cobalt blue and white. I chose this yarn mostly because of the colour and partly because of the name Snuggly Wuggly. It is 100% acrylic DK (#3) weight yarn available in a variety of colours. I like that it is easy care, long wearing and soft; perfect for baby projects. I also like that it comes in relatively large 5 oz (446 yard) size balls so there is no fear of running out with this project.  


I decided to use my Bobo Bunny Pattern as a prototype. I love how Bobo looks but felt he could be improved and perfected with a few tweaks. Using DK (#3) weight yarn and a smaller hook produces a tighter, neater stitch. Since I wanted this bunny to be similar in size to Bobo, I had to make significant changes to the pattern.

A friend at work asked me to make a bunny for her nephew's baby shower gift. She also asked me to add his name if possible. I had been trying to decide where to put a name when I came up with the idea of an ear 'tattoo'. I will embroider his name inside his ear. It will be subtle yet easy to see which is perfect.

I couldn't wait to show you Blue Bunny so I took advantage of the late afternoon sunshine to take his photo in the final stage before assembly. I still have to embroider his name and face then sew all the pieces together. I love this part of the process. I am more than pleased with the way Blue Bunny is turning out. I think he will be perfect for babies.
I expect to finish tonight but will wait for more sunshine to take proper photos posing Blue Bunny on his own and side-by-side with Bobo so you can see the differences more clearly. 

Since this bunny is SOLD, I think I will make another using DK weight yarn and my pattern as written below. I would like to test it once more to make sure it's a properly Perfected Bunny Pattern. 

I might also make one using worsted weight yarn with a smaller hook (3.5 mm) keeping yarn weights consistent so everything fits. I would like to see how much bigger it would be.

As always, I will continue to share photos as my bunnies grow and propagate. 


BLUE BUNNY PATTERN

PDF Version

Materials used:

1 ball (5 oz) of Loops and Threads Snuggly Wuggly yarn in cobalt blue.
1 ball (5 oz) of Loops and Threads Snuggly Wuggly yarn in white.
Polyester Fiberfill for stuffing
Small amount of black yarn (for eyes)
Small amount of pink yarn (for mouth)

Stitches used:

ch - chain stitch
ss - slip stitch
sc - single crochet
inc - sc increase (2 sc in same stitch)
dec - sc dec (sc2tog - single crochet 2 together)
Magic Circle - see how here (start each piece with magic circle)

Time to Complete - 16 hours (approximately)
Finished size - 12 inches tall

Legs (x2)

Use blue yarn. Working from the bottom up, starting with a magic circle, use stitch marker to mark end of rows (work in continuous rounds with no joining)

R1 - 6 sc (6)
R2 - inc x6 (12)
R3 - (sc inc) x6 (18)
R4 - (2 sc inc) x6 (24)
R5-R6 - sc around (24)
R7 - sc2tog x4 + 16 sc (20)
R8 - sc2tog x4 + 12 sc (16)
R9-R16 - sc around (16)
R17 - (3 sc inc) x4 (20)
R18-R20 - sc around (20)
R21 - (4 sc inc) x4 (24)
R22 - sc around (24) Finish off and stuff leg.

Body

Join legs on middle 2 stitches as shown in this tutorial. The instructions are in German but the video alone is enough to understand the technique. Once the legs are joined continue crocheting around both legs to form the body.

R23 - sc around (46)
R24 - sc around (46)
R25 - (5 sc inc) x 7 + 4 sc (53)
R26 - sc around (53)
R27 - (9 sc inc) x 5 + 3 sc (58)
R28 - (8 sc inc) x 2 + 40 sc (60)
R29 - sc around (60)
R30 - sc around (60)
R31 - sc around (60)
R32 - sc around (60)
R33 - (8 sc dec) x6 (54)
R34 - sc around (54)
R35 - sc around (54)
R36 - sc around (54)
R37 - (7 sc dec) x6 (48) [attach pom-pom tail]
R38 - sc around (48)
R39 - sc around (48)
R40 - sc around (48)
R41 - (6 sc dec) x 6 (42)
R42 - sc around (42)
R43 - sc around (42)
R44 - sc around (42)
R45 - (5 sc dec) x6 (36)
R46 - sc around (36)
R47 - sc around (36)
R48 - sc around (36)
R49 - sc around (36)
R50 - sc around (36)
R51 - sc around (36)
R52 - sc around (36)
R53 - sc around (36)
R54 - sc around (36)
R55 - (4 sc dec) x6 (30)
R56 - sc around (30)
R57 - sc around (30)
R58 - sc around (30)
R59 - (3 sc dec) x6 (24)
R60 - sc around (24)
R61 - (2 sc dec) x6 (18)
R62 - sc around (18)
Finish off and cut yarn leaving a long tail to attach the head. Stuff body firmly.

Arms (x2)

Start with white yarn
R1 - 6 sc (6)
R2 - inc x6 (12)
R3 - (sc inc) x6 (18)
R4 - sc around (18)
R5 - (4 sc dec) x3 (15)
R6 - sc around (15)
R7 - (3 sc dec) x 3 (12)
Change to blue yarn at end of R7
R8 - sc around (12)
R9 - (4 sc dec) x 2 (10)
R10-R30 - sc around (10)
Finish off and cut yarn leaving a long tail for joining. Stuff only hands and part way up arm.

Head

Use white yarn.
R1 - 6 sc (6)
R2 - inc x6 (12)
R3 - (sc inc) x6 (18)
R4 - (2 sc inc) x6 (24)
R5 - (3 sc inc) x6 (30)
R6 - (4 sc inc) x6 (36)
R7 - (5 sc inc) x6 (42)
R8 - (6 sc inc) x6 (48)
R9 - (7 sc inc) x6 (54)
R10 - (8 sc inc) x6 (60)
R11 - sc around (60)
R12 - sc around (60)
R13 - sc around (60)
R14 - sc around (60)
R15 - sc around (60)
R16 - sc around (60)
R17 - sc around (60)
R18 - sc around (60)
R19 - sc around (60)
R20 - sc around (60)
R21 - (8 sc dec) x6 (54)
R22 - sc around (54)
R23 - (7 sc dec) x6 (48)
R24 - (6 sc dec) x6 (42)
R25 - (5 sc dec) x6 (36)
R26 - (4 sc dec) x6 (30)
R27 - (3 sc dec) x6 (24)
R28 - (2 sc dec) x6 (18)
R29 - (2 sc dec) x3 + 6 sc (15)
R30 - sc around (15)
R31 - sc around (15)
Finish off and cut yarn leaving a long tail for joining. Stuff head and neck firmly to hold shape.

Hood

Use blue yarn and follow pattern for Head up to Row 24. Use hook size 3.5 mm to make hood slightly bigger than head to allow for an easier fit.
R1 - 6 sc (6)
R2 - inc x6 (12)
R3 - (sc inc) x6 (18)
R4 - (2 sc inc) x6 (24)
R5 - (3 sc inc) x6 (30)
R6 - (4 sc inc) x6 (36)
R7 - (5 sc inc) x6 (42)
R8 - (6 sc inc) x6 (48)
R9 - (7 sc inc) x6 (54)
R10 - (8 sc inc) x6 (60)
R11 - sc around (60)
R12 - sc around (60)
R13 - sc around (60)
R14 - sc around (60)
R15 - sc around (60)
R16 - sc around (60)
R17 - sc around (60)
R18 - sc around (60)
R19 - sc around (60)
R20 - sc around (60)
R21 - (8 sc dec) x6 (54)
R22 - sc around (54)
R23 - (7 sc dec) x6 (48)
R24 - (6 sc dec) x6 (42)
R25 - ss loosely around (42)
Finish off and cut yarn leaving a long tail for joining. Position on head as shown in photos above. After attaching head to body, I like to wrap the tail from the hood around the neck to cover joining stitches.

Ears (x2)

I followed a free pattern found here for the ears.

Check out photos of Blue Bunny in this post before joining ears, head and arms. I like to pin the pieces in place and pick the most pleasing look before attaching.


Be the first to comment - click on No comments: below


Friday, 18 April 2014

Easter Crochet

This year I would like to share Easter crochet I made over the past two years.

In 2012 I wanted to send something special to our Grandson in California for Easter. I decided to make a bunny with a floppy yellow hat which could double as an Easter basket along with six eggs for hiding. He loved it and still enjoys hide and seek with the eggs. 
My daughter sent this photo of our Grandson hunting for eggs at Easter. Isn't he cute? I loved that he enjoyed the gift and had fun with it. 

For fellow crocheters who might be interested, the bunny pattern can be found here. I made the hat using the hat pattern from Paddington Bear by blogger Yellow, Pink and Sparkly here and the eggs were made using this pattern by blogger Greedy For Colour. All of these patterns are free and provide easy to follow instructions. 

In 2013, our daughter moved to Boulder, Colorado. I decided to send three little chicks in eggs as an Easter surprise for our Grandson. I used this pattern to make the eggs and shells but added wings and copied the face style found in this photo on Pinterest. I also joined the shells with a couple slip stitches so they would stay together as one piece. I took this photo before mailing them off to Boulder. 
I loved the way they turned out and was thrilled when my daughter sent me this video of our Grandson receiving his gift. It makes me smile when I watch it. He is so cute and I love to see how much he has changed in the past year.
This year I decided to keep the decorating simple and use what I already have on hand. Pom-poms were the only new addition. I know I've shared most of these photos over the past few posts but thought it might be nice to show them all in one place.
I love Easter and am looking forward to a delicious Easter dinner at my parents' house with our family. There will be 11 of us this year. We will miss our daughter and her family as they are too far away to join us. I did not send crochet Easter treats to Boulder this year but am busy gathering things to send with my parents when they drive to Boulder to visit in May. I'll have to take pictures of the pile before they leave. I'm sure it will fill their vehicle.

This year our Grandson will be playing with real live chicks at Easter. I don't think crochet creations can compete with that. You can read all about it on our daughter's website Sweet Maple Photography and blog here. I spent lots of time on my grandparents' farm as a kid so I'm glad our grandchildren get to experience a bit of farm fun too.

Happy Easter Everybody!

Thursday, 27 February 2014

Awesome Amigurumi

I think Amigurumi is Awesome. As I mentioned in my first post, my daughter suggested I make crochet toys. I was reluctant until I found a Paddington Bear pattern posted by blogger Yellow, Pink and Sparkly here. As it turned out, this bear was just the start. I soon discovered the world of amigurumi.
  1. amigurumi
    Web definitions
    1. Amigurumi is how Japanese call the trend of knitting or crocheting small stuffed animals and anthropomorphic creatures. The word is derived from a combination of the Japanese words ami, meaning crocheted or knitted, and nuigurumi, meaning stuffed doll. ...
      http://en.wikipedia.org/wiki/Amigurumi
After the first Paddington Bear, I altered the pattern to work in the round following the amigurumi style which omits the seam created by "joining" each round. I made a few bears before I found a cute free bunny pattern here.  The first bunny I made was grey. I called him Dudley and mailed him to California along with a yellow hat made from Paddington Bear's pattern and 6 crochet Easter eggs. I found an Easter egg tutorial by Greedy for Colour here. Dudley's hat doubled as a basket for the eggs. He was a big hit with our grandson who was 1 1/2 years old at the time. 'Hide and seek' for eggs became a popular game.    
Dudley Bunny

After making the bear and then the bunny, I found all sorts of free animal patterns I was eager to try. Before long, I had completed a bunch of Awesome Amigurumi for our grandson. Check out the photos below. The caption provides a link to each individual pattern.
Boyington Bear
Buttercup Bear
Tootsie Bear
Tiny Bear
Bonnie Bunny & Benny Bunny
Curious George
Baby Elephant
Mouse
Spike the Dragon
Alby the Baby Snow Dragon
I finished all these toys then decided to write a story for our grandson featuring each one. I wrote the story then my husband and I spent a lovely summer afternoon in my parent's garden getting just the right photos to illustrate the book. It was a lot of fun to make and even more fun to see our grandson's face when our visit brought his 'book' to life.

I have used some of the book photos in this post but here is a link to the book if you would like to take a look. There were four copies printed: 1 for our grandson, 1 for us and 1 for each of our parents. 

I have to confess I missed one typo on the front cover. I credited my husband for the photography but mistakenly called him "Gandad" instead of "Grandad". I truly did not see it until my daughter pointed it out. Oh well, I corrected the on-line version. Our grandson did call my husband Gandad before he could say Grandad properly. He used to call me 'Mimi' but now says Grammeo very clearly and I love to hear him call me that.