Wednesday, 3 December 2014

Crochet Advent Garland

Last year I was inspired to make a Crochet Advent Garland using crochet mittens. I came up with the idea when I saw this Cozy Mitten Garland posted by blogger Erica at Caught on a Whim. 

I used the preschool size mitten pattern referenced in Erica's post. It is available for free here. I made 25 mittens in a rainbow of colours, embroidered numbers 1 through 25 then joined the mittens with a row of chain stitches. The chain needed to support the weight of the mittens stuffed with gifts so I added a row of single crochet to make it stronger. It works perfectly as a Crochet Advent Garland.

I used red yarn to join the mittens, white yarn to embroider numbers and an alternating rainbow colour scheme for the garland. A white mitten with red lettering was saved for last to represent Christmas.

See how mittens 1 and 2 are red, mittens 23 and 24 are pink and the rest alternate colours? I could pretend I planned it that way. In truth, I embroidered a number 2 on the second red mitten by mistake then changed my plan to make it look intentional. Do you ever make creative adjustments like that? Surely I can't be the only one. 

I took a photo of my Crochet Advent Garland spread out on the floor. I also hung it on our mantle to see how it looked. I think it turned out just fine despite my colour scheme correction.
Finding so many tiny items to stuff in the mittens was challenging. I took my time selecting gifts and wrapping them in tissue paper. Little chocolate treats would have been easy but our daughter did not want her son eating chocolate every day leading up to Christmas. I understood her concern and agreed with her decision of course.
I was able to finish this project in time for Thanksgiving last year when our daughter and her family came to visit. My Crochet Advent Garland full of little gifts fit perfectly in this clear plastic pouch. I always save these zippered pouches when we buy linens as they work so well for this sort of thing and are great for storage too.
This year I have not yet made anything Christmas specific as I've been busy making dolls. I do have an idea for another Crochet Advent Calendar though. We need two calendars now that we have two grandchildren. 

Thank goodness there is no rush. This year our granddaughter is too young to care about such things plus they will be away for Christmas. Next year will be different though. Next year she will be almost two and they will probably celebrate Christmas at home. 

Next year if I decide to make a Crochet Advent Calendar, I will be sure to share photos and pattern details. 


Be the first to comment - click on No comments: below.

Monday, 1 December 2014

Miss Bonnie Blue

With my Christmas decorating done on Saturday, I made another crochet cutie on Sunday. Meet Miss Bonnie Blue with the beautiful blue hair, blue sweater and blue shoes. I think the name suits her, don't you?
I am not yet tired of making dolls from this free pattern and I hope you're not tired of seeing them fresh off my hook so to speak. There are just so many different ways to customize these cuties to keep them interesting. 

With Miss Bonnie Blue I added a full head of hair instead of a hoodlie with hair peaking out. I watched this Crochet Amigurumi Hair Tutorial video by Allison Hoffman of CraftyIsCool. Allison does a fabulous job of explaining the process. I made a blue cap to attach to the top of her head, then added yarn "hair" as described in Allison's video. 

I used a small ball of crinkly blue yarn left over from another project. Luckily there was enough to completely cover Bonnie's head. I trimmed the ends to be even at the bottom with long layers throughout which gives a more natural style. What do you think? Doesn't she look cool with her curly blue hair?

After posing for her photo, Bonnie rides the trike with Bobby on back.
Bobby and Bonnie enjoy riding while Izzy and Violet wait their turn.
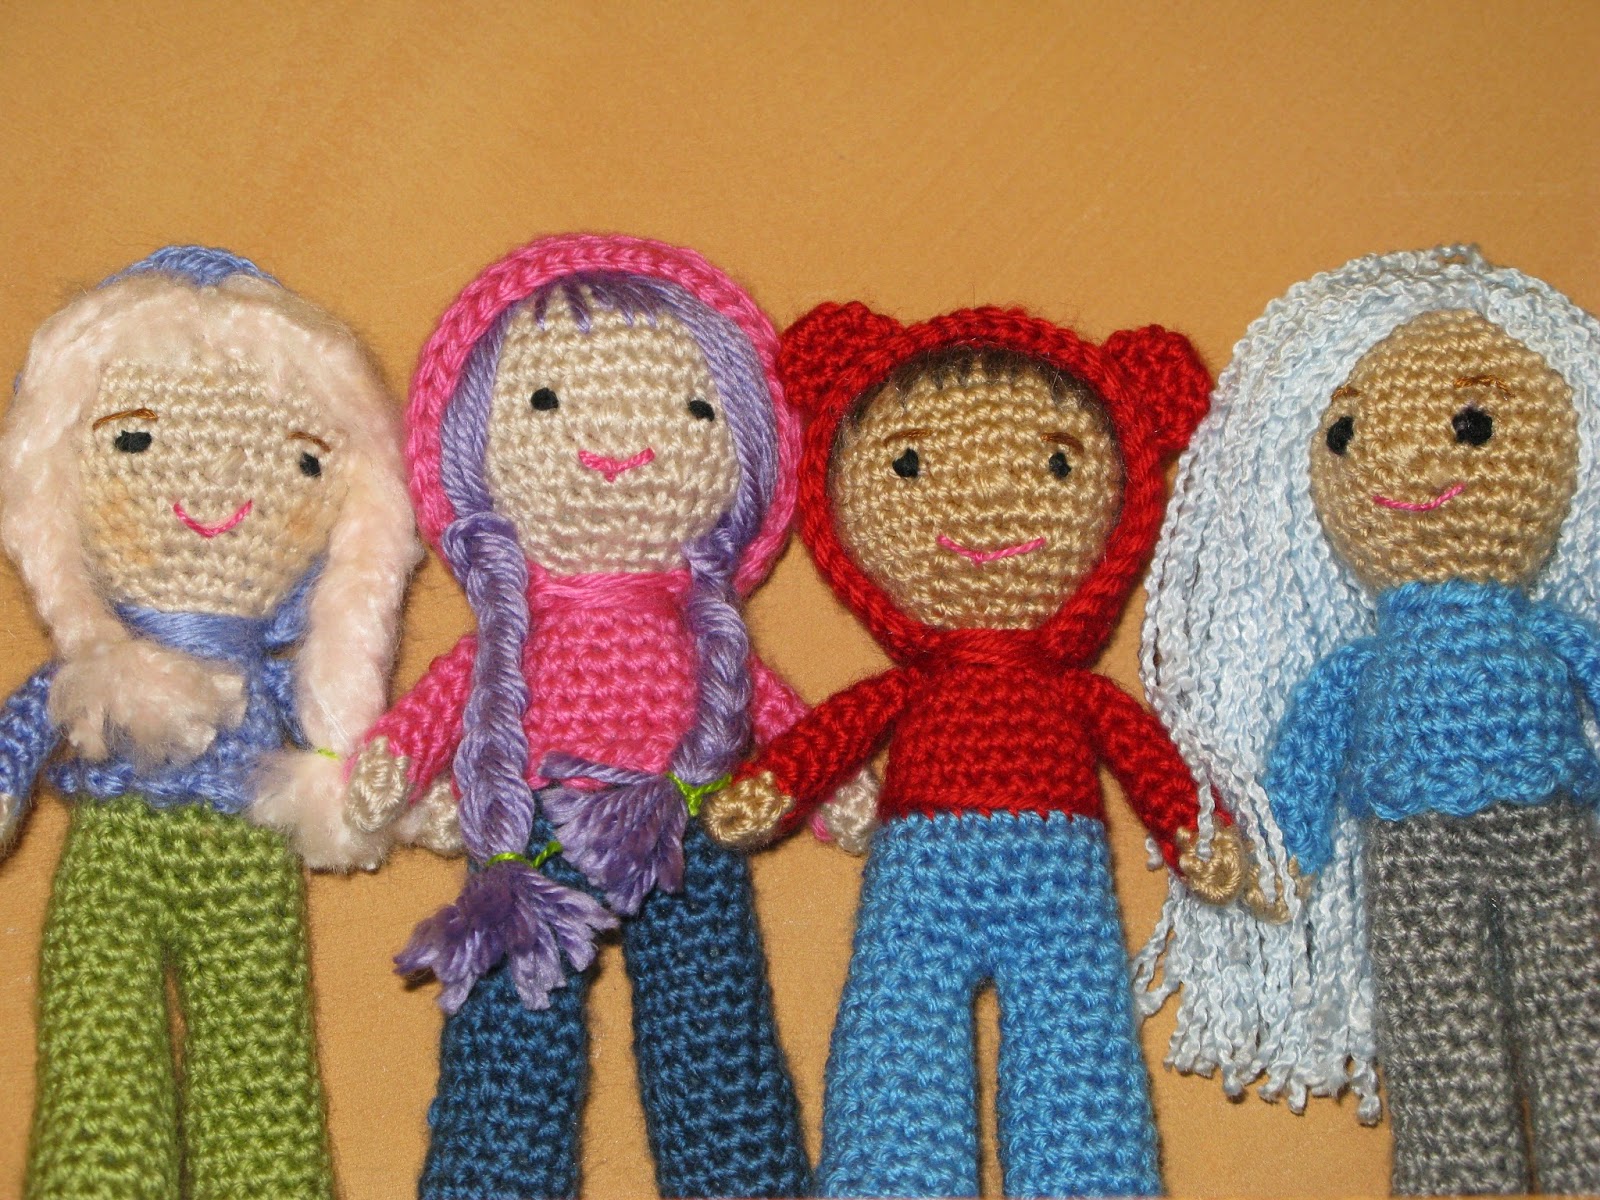
Now that we have four crochet cuties I request a group photo. Bonnie is looking away in this shot.
This time Bonnie is looking while the rest look away. Group shots can be challenging.
One more pose looking up at Izzy, Violet, Bobby and Bonnie from below. This angle provides an interesting perspective, don't you think?
Miss Bonnie Blue is a welcome addition to the Crochet Cuties Club. I will be sure to keep you posted as this group grows. Although I may take a little break to work on other projects. Amigurumi is fun but requires tight tension which can be a bit of a strain on my fingers after a while.


Be the first to comment - click on No comments: below.

Saturday, 29 November 2014

Christmas Decorating Done

I have been busy decorating for Christmas this week. I started Thursday night switching out regular dishes with Christmas dishes and carrying all the bins of Christmas stuff upstairs to the dining room. Friday night, I unpacked the bins and arranged our Christmas decorations then carried all the empty bins back to the basement. 

My Saturday morning cappuccino is served in a Christmas mug of course. The book is used for checking off rows as I crochet toys. I like to keep my colourful button jar on display as you never know when a button might be needed.
I love this colourful crochet snowflake banner made from a pattern by Attic24 found here and a tin snowman. This is the view from my crochet corner on the sofa.
I like to display a jar full of colourful yarn ends and bowls of yarn balls on our mantle. I think it's fun and appropriate considering my passion for everything crochet. 
Crochet dolls adorn our mantle too. I plan to make more once my Christmas Decorating is Done.
Last year I made this crochet striped stocking using a free pattern by blogger Yvestown found here. It provides a perfect place for my little crochet mouse to hang out. We also have a whole family of snowmen sitting in front of the window by the fireplace. I love to see them there.
A couple years ago, I crocheted a pretty edge around some of my favourite Christmas cards. They make a nice display hung with clothespins to some twine along our railing wrapped in Christmas lights.
I also added Christmas knickknacks to our hall  cabinet. The cute little snowman was a gift from our daughter many years ago. The little Christmas tree is a music box. 
 
I have hung crochet stars and a little snowman on the wreath in our dining room. The snowman was made using this pattern by the Dapper Toad and the stars from a free pattern found here on Ravelry.
Today my husband carried our Christmas tree up from the basement. We store it in the original box which is held together with a big yellow strap. Over the years, we have set up the tree in different rooms. The living room and the family room were both popular spots but last year, I put it in the hallway and loved it. We see it every time we walk by and it's across from the dining room which is perfect for Christmas.
I spent a couple hours assembling the tree and decorating it today. I couldn't help but notice some of the branches have broken and/or sagged over the past 20+ years but it's amazing what lights, beads, bows and ornaments do for a tired old tree. Doesn't it look great?
I think the new crochet tree skirt fits in perfectly too. Remember it from this post? This is a meo my crochet original pattern and it's free if you would like to make one too.

I've taken a few more photos to share. I hope you enjoy our simple Christmas decorating. I love the memories stirred by all our ornaments collected over the years. 

This angel was purchased in the after Christmas sales from a little store on Bayview in Toronto where we lived when we first got our tree.
So many homemade and gifted ornaments added to our collection over the years.
This old wooden sled fits nicely under our tree and the singing Christmas monkey is a fun addition.
Crochet skates I've had for years (not made by me) and an ornament made by our daughter many years ago. This year she will be in Brazil visiting her husband's family and enjoying a different kind of Christmas on the beach.
Three things of note here; a crochet star (made by me), an ornament my husband brought back from Germany and a very cute snowman our son gave us for Christmas 2007. Did I mention I love snowmen?
And this is the view from upstairs. I think our Christmas Decorating is Done. I hope you enjoyed the tour.
Our poodle spent the morning waiting patiently and comfortably on the back of our sofa. All the moving and rearranging is unsettling for her so I think she is very happy Christmas Decorating is Done.

* * * * * 

Be the first to comment - click on No comments: below.

Wednesday, 26 November 2014

More Crochet Toys

This week I made two more crochet toys; another doll and an owl.

Meet Bobby. I used the same pattern detailed in this post but altered the hair and colours to make a little boy and this time I added bear ears to the hoodie. I was inspired by seeing a photo of our grandson trying on his baby sister's snowsuit with bunny ears.
With three dolls done, I decided to make an owl just for a change of pace. I followed a free pattern by blogger isitatoy found here with a few changes. I embroidered the beak and eyes, added tufts on the ears and did the body in one colour with a few "feathers" embroidered on the tummy. I think it's a pretty purple owl and perfectly safe for little ones.
My three dolls are very happy together. VIolet, Bobby and Izzy smile for the camera but Bobby is distracted by the bike. I think he'd like a turn.
My pretty purple owl tries to hide and blend in with other purple things.
I manage to convince the whole gang to pose nicely for this group shot. They're a colourful bunch of crochet cuties.
It's been a productive week so far at meo my crochet but I think I will take a break and start decorating for Christmas. It'll be fun even if it does take me away from crochet for a bit.


Be the first to comment - click on No comments: below.


Sunday, 23 November 2014

Meet Miss Izzy

Meet Miss Izzy my newest crochet doll. Isn't she cute with her fluffy, frizzy braids and big grin?

Miss Izzy is my second crochet doll made using the same free pattern referenced in this post. I love how changing colours, hair and facial features make a new and different looking little doll. I also love that Izzy and Violet are already enjoying hanging out together. I can tell they are going to be great friends.
I think I need to make a boy doll next. I'll make him in bold colours with short hair, omit the ruffle on the hoodie and perhaps add bear ears. I'm really getting into this doll-making thing.

My favourite part is seeing the finished doll and naming it before taking a few photos to share. These silly photos make me smile. I really do enjoy the whole process and hope they add a wee bit of happiness to your day too. Keep on smiling and have a truly great week.


Be the first to comment - click on No comments: below.

Saturday, 22 November 2014

Faery Door Fun

I love our custom crafted Faery Door created by a Celtic artist at The Sidhe Ring. We picked it up this morning after placing the order just last Saturday and it's even better than I imagined. 

Remember the hole in the wall we wanted to fix? Last week, I traced the hole onto a piece of paper and took it to The Sidhe Ring. 
This week our hole has been replaced with this gorgeous, oldy-worldy, wooden Faery Door. The artist was able to use my paper template to cut the door to the exact size and shape of the hole. What do you think? Isn't it amazing? 
Miss Violet poses by the door while our poodle watches to see what all the fuss is about. 
Miss Violet opens the door to peek inside. I love that our Faery Door opens. It's very dark and nobody's there. Oh well, word will spread. 
I've heard Faeries like to leave messages and treats when little ones come to visit. I'm so looking forward to seeing what our grandchildren think of this little bit of whimsy. 

Thanks so much to The Sidhe Ring for making such a beautiful and fun Faery Door. It's perfect and I LoVe it.


Be the first to comment - click on No comments: below.

Friday, 21 November 2014

Cute Crochet Doll

Last night I finished my first Cute Crochet Doll. Meet Miss Violet with the pretty purple braids.
Violet is perfect for little ones. She stands 7.5" (19 cm) tall and loves to ride a trike. I think she is super cute and I can't wait to make more in a rainbow of colours.

I followed a free pattern on Ravelry called "Doll in a Bear Hoodie" by Tracey MacIntyre but I made a few minor alterations. I embroidered her facial features to make her perfectly safe for little ones. I also omitted bear ears on the hoodie just because I liked her without them.  

I've included a list of supplies I used to make this doll in case you would like to make one too.

Bernat Satin - 100% acrylic worsted weight yarn in the following colours
  skin - sandstone
  hoodie - mai tai
  pants - teal
  shoes - grey mist heather
  hair - lavendar
Fiberfill stuffing
Embroidery Thread (white, green, black, pink)
3.25 mm crochet hook
Yarn needle

Remember customization is encouraged with this pattern so you can select any colours, embellishments or facial features you like to make a Cute Crochet Doll. Just have fun with it and be sure to share a photo when you finish. I'd love to see your version of this Cute Crochet Doll.


Be the first to comment - click on No comments: below.