Sunday 31 May 2015

Crochet for Breakfast

Eggs sunny side up and whole wheat waffles with strawberries - yummy.
 
 
This week a Google+ Crochet Along member posted photos of waffles and eggs she made for her toddler. She was kind enough to share the pattern link. It is available for free on Ravelry by High Strung Designs and can be found here if you would like to make some too.

This is a fun project sure to be a hit with our grandchildren. I teased our cat who was peeved when she realized it wasn't edible. Even my husband was fooled briefly. 

Today it's Crochet for Breakfast. Bon Appétit!

Be the first to comment - click on No comments: below 

Monday 25 May 2015

Ellie Elephant Pattern

ELLIE ELEPHANT PATTERN

PDF Version


Materials used:

100% acrylic worsted weight yarn
partial ball of Bernat Satin Grey Mist Heather (grey) 
partial ball of Bernat Satin Stone (off white) 
partial ball of Bernat Satin Sapphire (blue)
Small amount of black yarn (for eyes)
Small amount of light pink yarn (for mouth)
Hook size = 3.25 mm
yarn needles to join pieces
Polyester Fiberfill for stuffing

Stitches used:

ch - chain stitch
ss - slip stitch
st - stitch(es)
sc - single crochet
sc2tog - single crochet 2 together
inc - 2 sc in same stitch
blo - back loop only
hdc - half double crochet
hdc inc - 2 half double crochet in same stitch
dc - double crochet
Magic Circle - see how here (start each piece with magic circle)

Time to Complete - 15 hours (approximately)
Finished size - 11 inches tall

Legs (x2)

Use grey yarn. Working from the bottom up, starting with a magic circle, use stitch marker to mark end of rows (work in continuous rounds with no joining)

R1 - 6 sc (6)
R2 - inc x6 (12)
R3 - (sc inc) x6 (18)
R4 - (2 sc inc) x6 (24)
R5-R6 - sc around (24)
R7 - sc2tog x4 + 16 sc (20)
R8 - sc2tog x4 + 12 sc (16)
R9-R13 - sc around (16)
R14 - (3 sc inc) x4 (20)
R15-R16 - sc around (20)
R17 - (4 sc inc) x4 (24)
R18 - sc around (24) Finish off and stuff leg.

Body

Join legs on middle 2 stitches as shown in this tutorial. The instructions are in German but the video alone is enough to understand the technique. Once the legs are joined continue crocheting around both legs to form the body.

R19 - (23 sc inc) x2 (50)
R20 - sc around (50)
R21 - (4 sc inc) x10 (60)
R22 - sc around (60)
R23 - (9 sc inc) x6 (66)
R24 - sc around (66)
R25 - sc around (66)
R26 - sc around (66)
R27 - sc around (66)
R28 - sc around (66) [switch to blue at end of row)
R29 - (9 sc sc2tog) x6 (60)
R30 - sc around in blo (60) [front loop open for frilly edge)
R31 - sc around (60)
R32 - sc around (60)
R33 - (8 sc sc2tog) x6 (54) 
R34 - 14 sc (sc2tog)x2 + 20 sc (sc2tog)x2 + 12 sc (50)
R35 - sc around (50)
R36 - 14 sc (sc2tog)x2 + 16 sc (sc2tog)x2 + 12 sc (46)
R37 - sc around (46)
R38 - 14 sc (sc2tog)x2 + 12 sc (sc2tog)x2 + 12 sc (42)
R39 - sc around (42)
R40 - 12 sc (sc2tog)x2 + 12 sc (sc2tog)x2 + 10 sc (38)
R41 - sc around (38)
R42 - 11 sc + sc2tog + 15 sc + sc2tog + 8 sc (36)
R43 - sc around (36)
R44 - (4 sc + sc2tog) x6 (30)
R45 - sc around (30)
R46 - sc around (30)
R47 - (3 sc + sc2tog) x6 (24)
R48 - sc around (24) [switch to grey at end of row]
R49 - (2 sc + sc2tog) x6 (18)
R50 - sc around (18)
Finish off and cut yarn leaving a long tail to attach the head. Stuff body firmly.

Ruffle

Using blue yarn.
Pick up loop from R30 at back of body joining blue yarn. Work with body upside down.
*Ch2, dc in next st, ss in next st** 
Repeat * to ** around.
Finish off and weave in ends.

Arms (x2)

Start with stone.
R1 - 6 sc (6)
R2 - inc x6 (12)
R3 - (sc inc) x6 (18)
R4 - sc around (18)
R5 - (4 sc dec) x3 (15)
R6 - sc around (15)
R7 - (3 sc dec) x 3 (12)
Change to grey mist heather at end of R7
R8 - sc around (12)
R9 - (4 sc dec) x 2 (10)
R10-R29 - sc around (10)
Change to sapphire at end of R29
R30-R34 - sc around (10)
Finish off and cut yarn leaving a long tail for joining. Stuff only hands and part way up arm.

Head

Use off white yarn.
R1 - 6 sc (6)
R2 - inc x6 (12)
R3 - (sc inc) x6 (18)
R4 - (2 sc inc) x6 (24)
R5 - (3 sc inc) x6 (30)
R6 - (4 sc inc) x6 (36)
R7 - (5 sc inc) x6 (42)
R8 - (6 sc inc) x6 (48)
R9 - (7 sc inc) x6 (54)
R10 - (8 sc inc) x6 (60)
R11 - sc around (60)
R12 - sc around (60)
R13 - sc around (60)
R14 - sc around (60)
R15 - sc around (60)
R16 - sc around (60)
R17 - sc around (60)
R18 - sc around (60)
R19 - sc around (60)
R20 - (8 sc dec) x6 (54)
R21 - sc around (54)
R22 - (7 sc dec) x6 (48)
R23 - (6 sc dec) x6 (42)
R24 - (5 sc dec) x6 (36)
R25 - (4 sc dec) x6 (30)
R26 - (3 sc dec) x6 (24)
R27 - (2 sc dec) x6 (18)
R28 - (2 sc dec) x3 + 6 sc (15)
R29 - sc around (15)
R30 - sc around (15)
Finish off and cut yarn leaving a long tail for joining. Stuff head and neck firmly to hold shape.

Hood

Use grey yarn. Check to make sure hood fits head and adjust tension based on fit. You may have to move up a hook size if the hood is too tight.
R1 - 6 sc (6)
R2 - inc x6 (12)
R3 - (sc inc) x6 (18)
R4 - (2 sc inc) x6 (24)
R5 - (3 sc inc) x6 (30)
R6 - (4 sc inc) x6 (36)
R7 - (5 sc inc) x6 (42)
R8 - (6 sc inc) x6 (48)
R9 - (7 sc inc) x6 (54)
R10 - (8 sc inc) x6 (60)
R11 - sc around (60)
R12 - sc around (60)
R13 - sc around (60)
R14 - sc around (60)
R15 - (8 sc sc2tog) x6 (54)
R16 - sc around (54)
R17 - sc around (54)
R18 - sc around (54)
R19 - sc around (54)
R20 - sc around (54)
R21 - Ch10, skip 10 sc, sc around (54)

Starting Trunk
R22 - 10 sc blo, sc (to anchor), 10 sc in ch stitches from behind (20)
R23-R28 - sc blo around (20)
R29 - (sc2tog + 8 sc) blo x2 (18)
R30 - sc blo around (18)
R31 - (sc2tog + 7 sc) blo x2 (16)
R32 - sc blo around (16)
R33 - (sc2tog + 6 sc) blo x2 (14)
R34 - sc blo around (14)
R35 - (sc2tog + 6 sc) blo x2 (12)
R36 - sc blo around (12)
R37 - sc blo around (12)
R38 - sc blo around (12)
R39 - sc blo around (12)
R40 - (sc2tog + 6 sc) blo x2 (10)
R41 - sc blo around (10)
R42 - sc blo around (10)
R43 - sc blo around (10)
R44 - (sc2tog + 6 sc) blo x2 (8)
R45 - sc blo around (8)

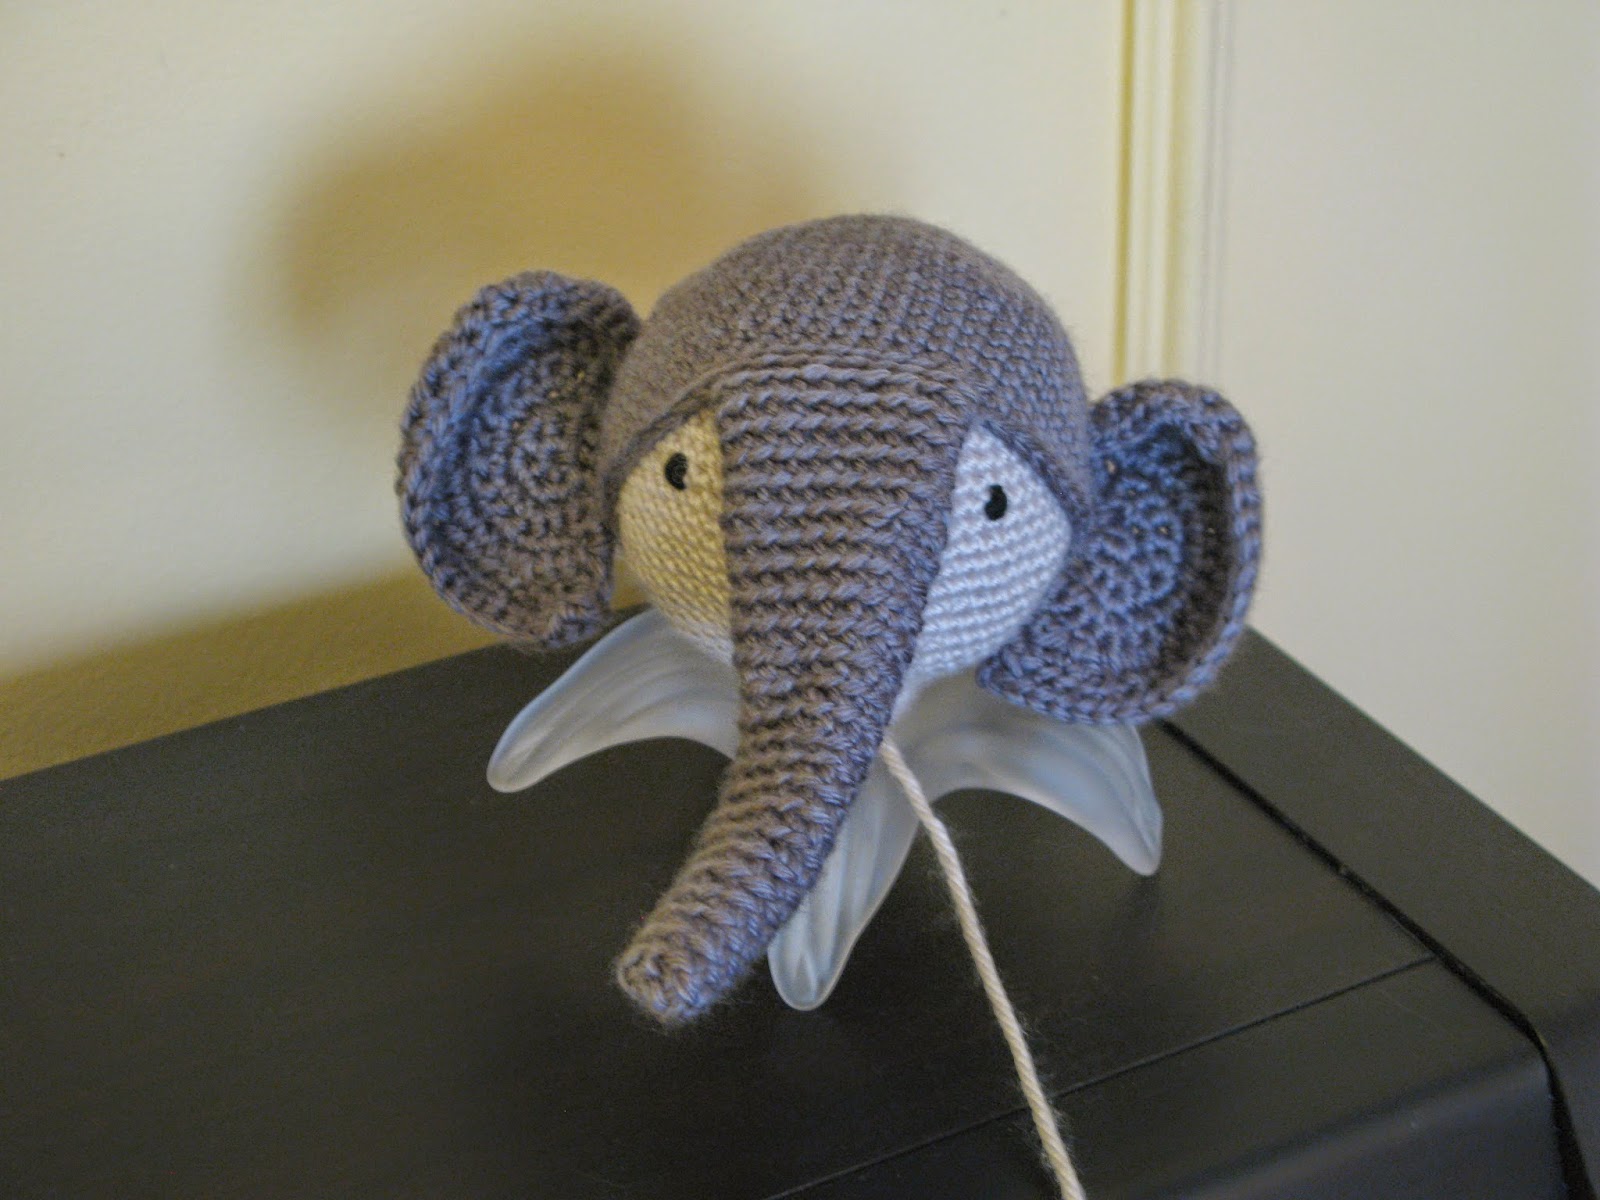
Finish off and and weave in ends. Do not stuff. Place on head as shown in photos above. After attaching head to body, I like to wrap the tail from the hood around the neck to cover joining stitches.

Ears (x2)

Use grey yarn.
For rows 1-7, I followed instructions including step-by-step photos found here by blogger Dedri at Look At What I Made.

R1 - With grey yarn:  ch 2, 5 sc into the 2nd ch from the hook, ch 1 and turn (5)
R2 - inc in each st, ch 1 and turn (10)
R3 - (inc, sc) x 5. ch 1 and turn (15)
R4 - (inc, 2 sc) x 5, turn (20)
R5 - Short Row: Skip 2 st, sc inc in the next st, sc in the next and ss in the next, ch 1 and turn.  (3 – not including the ss)
R6 - Short Row: Skip the ss, ss in the next st, hdc inc in the next st and dc in the last st, ch 1 and turn. (4 – including the ss)
R7 - 4 sc,  at the “step” hdc in the st at the base of the step (which already contains a ss), (3 hdc, hdc inc) x3, sc in the third last stitch and ss in the last 2 st’s, ch 1 and turn. (21 – not including the ss)
R8 - sc, 2 hdc, 3 dc, 3 hdc. 7 sc, 6 ss, sc in next st, ch 1 and turn
R9 - sc around, 2 sc at end of row (26 st) then continue to centre (6 st), ch 1 and turn
R10 - sc to point, 2 sc in next st, 6 sc

Finish off leaving 8" tail for joining.
Fold ear to form a natural curl at the top and attach to head (see photo above).

I like these ears, but might make even bigger ones for my next elephant. I will be sure to provide instructions if I do.

Tail 

Use grey yarn.
R1 - sc 12
R2 - ss in back bumps of ch (11)
Finish off.  Cut yarn ends ~1/2" long and separate strands to form a small tuft. Join to body using another length of grey yarn (see photo above).

Ellie is my first baby elephant. You can read about her humble beginnings here and her introductions to the world here. If you decide to make one too, I'd love to see photos when you're done.


Be the first to comment - click on No comments: below

Sunday 24 May 2015

Ellie Elephant Ta-Dah!

Just look at Ellie Elephant. Isn't she sweet in her frilly blue top? She lifts her trunk, flaps her ears and wags her tail with excitement.
  
 
Ellie looks a bit nervous meeting the whole gang even though they welcome her with open arms and smiles. It won't take long to settle in with such a friendly bunch in a basket.
Ellie was made from scraps of worsted weight acrylic yarn (Bernat Satin in Grey Mist Heather, Sapphire and Sandstone) and a 3.25 mm hook. 

I was running low on Grey Mist Heather and could find no more in London, so decided to add a blue (sapphire) top with a ruffle edging. 

Now that I see what's left, I think there might have been just enough to finish Ellie in grey. Oh well, Ellie likes her pretty top and so do I. 
When I finish writing Ellie's pattern, I will be sure to share and add the link to my Free Crochet Patterns page.

Update: Pattern for Ellie Elephant has been posted here. Enjoy!


Be the first to comment - click on No comments: below

Tuesday 19 May 2015

Making an Elephant

I started making an elephant yesterday. It's a baby elephant in the same style as my other crochet creations. The trunk and ears turned out even better than expected. I love how she looks so far. 

For the body, I will follow my pattern for Pink Piglet. I might have to buy more yarn to finish. Let's hope I can find the same colour.
Ellie the Elephant is off to a good start. More photos and a pattern coming soon. I am excited to finish this one.


Be the first to comment - click on No comments: below 


Sunday 17 May 2015

Little Lambs

A friend from work moved to a farm west of London earlier this year. He and his wife adopted five sheep, two pot belly pigs, a dog and a rooster. Quite a menagerie. 

When he told me two of their sheep had lambs last week, I had to visit. I bottle fed and raised two lambs on my grandparents' farm when I was young. The first I named Twinkle; the second Frisky.   
These lambs are totally adorable. I'm not sure if they've been named yet. 
  
They stick together and nurse from the same ewe. One ewe has mastitis and is having trouble nursing, so the lambs also get a bottle.
 
The rooster and lamb size each other up. It's great to see how well all the animals get along. The bag of carrots I brought was enjoyed by both pigs and sheep alike.
This black sheep is the biggest and hungriest. She ate most of the carrots, then kept me busy picking lush green grass. She loved it all.
When we got in the car to leave, the rooster stood on the fence and crowed his good-byes while the black sheep watched. 

Don't worry, we'll be back. We'll bring our grandchildren. They love feeding animals too.


Be the first to comment - click on No comments: below

Friday 15 May 2015

Brown Boo Bear

I finally finished Brown Boo Bear. I took a photo before joining his parts - body, arms, head, ears and tail.  
He was made using Bernat Alpaca Natural Blends yarn in tundra (brown) and natural (off white). This acrylic alpaca blend is both durable and soft - perfect for bears. 100 g of Chunky (#5) weight yarn does not go as far as worsted weight, so scraps wouldn't cut it this time. I bought two more balls (one in each colour) to finish.

Meet Brown Boo Bear. He poses showing off both his front and back.
Brown Boo Bear is 2" taller than Boo Bear. I used the same pattern and hook size, but chunky #5 weight yarn makes a much bigger bear. 
Despite their differences, these two are bound to be Boo Bear Besties.
A kind reader pointed out some errors in my pattern for Boo Bear. Stitch counts on a few rows in the body did not add up, but have now been corrected. I was thrilled to hear from somebody trying my patterns. She promised to send me a photo when she finishes which is very exciting. 

If you would like to make one too, you can find the pattern on my Free Crochet Patterns page here. Alternatively, you can jump straight to the pattern here.


Be the first to comment - click on No comments: below

Monday 11 May 2015

Taste of Freedom

On May 1st, our son moved to Guelph into a house he will be sharing with five friends for his second year at University. Since rentals run May to April, he and a few others decided to stay the summer. 

They plan to get jobs and enjoy a Taste of Freedom involving fewer rules and more independence. They liked living in residence, but were ready to move on. Our son likened it to 'day care' for big kids. I get it.

Freedom for us means an 'empty-nest'. Once I learn to stop worrying, I'm sure I'll love this phase. There was no internet at the house and, since I don't own a smart phone, communication was limited. 

I got one anxious call the first weekend. Our son needed to turn off the water because the 'bath was broken'. I told him to call his Dad or his Grandpa then I sent an email to his landlord who was able to arrange for a plumber to fix the problem. Our son now knows how to turn off the water and how to contact his landlord if necessary. He's learning to cope and I'm learning to let him. That's the hard part.

I tried not to worry last week. It wasn't easy. Was he eating right? Will he get a job soon? How will he manage if he doesn't. We pay rent, tuition and books, but he has to cover his food and other expenses. More freedom means more responsibility. He's growing up.  

Finally by Friday, our son was back on-line and I was relieved to get the following photos. They have been shopping and they love cooking.
I was happy to see their delicious looking meals. They've got it handled.
 
 
So far there are three in the house, another stays once a week, plus another may be joining them soon. It will be a full house by September. 

Our son is still looking for work. Fingers crossed he gets something soon. His girlfriend who plans to be a vet someday is volunteering at two vet clinics and starts her paying job tomorrow.

They want us to visit. I'd love to. My husband is not keen as he will be in Guelph for work on Friday plus another day next week. He will drop by when he's there. I might have to drive myself if I want to see them. Maybe I'll take my parents. They would love to see his new place too.

For now, I am happy our son is enjoying a Taste of Freedom.

* * * * *
If you would like to read about his move into residence last year, check out this post.


Be the first to comment - click on No comments: below